Monday, February 18, 2013

Blue "Drops" Blanket

I finished my "Drops" blanket for Traci, who is due March 24! I love this girl - we had the same due date, the same husband's name, the same baby's name...it's so fun!

I found this beautiful pattern on Pinterest (ok...I love Pinterest, what can I say). It comes from a website that I mentioned in an earlier post, and for some reason, it is in their group of patterns called "Drops" patterns. Anyway, the name stuck with me and I will now always refer to this particular type of blanket as my "drops" blanket.

I should have realized this was going to be such a huge undertaking. You have to make 20 individual squares, much like a granny square blanket, and sew them all together. I have never made anything like that before, so to stay on the safe side, I slipped stitched the squares together with my hook. It turned out with a beautiful ridge, but it really pulled the squares together more than I wanted it to. Unfortunately, the blanket does not lay as flat as I would like because of it (you have to really smooth it out on the floor to get a good look at it), but I think it still turned out alright.

I will also say that in sewing together squares, don't do it the way I did it! I would combine two squares together and cut the yarn! Then I would add another square and cut the yarn! DON'T DO THIS!!! If you want to save yourself any sanity, sew all the way through the row and then cut the yarn. It might seem weird, but trust me, it will save you a lot of time in the end when you're weaving everything in.

But all in all, I think the blanket turned out really well. Small, but well.

I used size G hook and Caron Simply Soft yarn, Country Blue. Beautiful yarn, but rather annoying that it came unraveled so easily.

Here it is! I hope she enjoys it!


Tuesday, February 12, 2013

Show & Tell

Since none of my current projects are finished, I'll take a time to have a little Show & Tell!

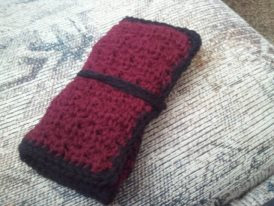
Today's little gem comes from a blog called "Alli Crafts" (link to free pattern here). I had just started picking crochet back up (around April/May last year?) and decided I really needed something to store all my hooks in. My mother-in-law actually has this really nice case with a zipper, but I didn't want to spend any extra money on this. So I did some Googling, picked up some old yarn that I had, and started to work!

These are just phone pictures, so sorry they're not the best!


Alli Crafts, like a lot of other people, came up with her design by using the star stitch (found on The Crochet Spot Blog). It's basically just a rectangular block full of star stitches!


I added the border just to give it a little more of a finished work. I LOVE this case because the holes are perfectly lined up and just snug enough to hold even my smallest hook (size 6). It even holds my tapestry needle!

I also love that now all of my hooks are in one place. I love the bold/dark color, making it easy to find and stands out against most of the yarn I usually have.

Like I said, I love my crochet holder and am so glad I made it. Check Alli Crafts out for her free pattern - you'll be happy you did!

Saturday, February 2, 2013

Beautiful

I've never done this kind of crocheting before. I've always stuck with the simple, bulky-type looks. I've never ventured into the lace side of crochet before. Not that this is really lace, but it is closer than anything else I've ever done. I found this pattern on Pinterest and it can be found on this website www.garnstudio.com. The direct link is here. Anyway, it took me a couple practices to get this right. Before I had the yarn for the blanket I am going to make, I only had crochet thread. Which still worked out very nicely! Here is a sample of one of my practices. I did finally get the yarn and I'll hopefully be done with the blanket around Wednesday next week.

Isn't it beautiful??


And now I just can't help myself whenever I see a beautiful lace alter cover! I'll admit that I was a little focused on that during last night's session. But come on, haven't you ever wondered how those covers are made, too??

Also learning this makes me want to learn tatting. I wonder if I know anybody that can teach me...